D.C. Earthquake Reporting & the Power of the Mobile Web

D.C. Earthquake

Minutes after 1:53 p.m. EST today, I noticed my Facebook and Twitter connects updating their statuses and tweeting about an event: “earthquake!”

I searched Google News and found this: Rare Strong Earthquake Hits Colorado, when today’s first quake struck Colorado. Five minutes after the event, few if any mainstream news organizations had posted a story about the D.C. quake.

Yet Twitter was exploding with people posting about the D.C. earthquake the instant it was happening, many from their mobile phones:

D.C. Earthquake Tweets

This is the power of the mobile web and a powerful side of technology. We are all citizens, always reporting.

Thankfully, no injuries were reported.

5 Ways I Use SugarSync to Sync and Share Files, Music & Photos in the Cloud

SugarSync iPhone

In just a month, SugarSync has become one of my most valued iPhone apps.

I recently decided that it was time to get serious about backing up my files. With all of the projects that I work on, it would be a major setback to lose the data on my harddrive.

While most of my files are backed up on hosting servers — specifically HostGator, which I trust a lot after 5 years — even the best web hosting servers can go down and you could end up with a near-tragedy on your hands. Imagine losing everything.

I originally downloaded SugarSync specifically so that I could back up my iPhone photos as I take them. But since then, I’ve come to realize how useful, and important, a good cloud storage service really is.

Below are 5 ways that I use SugarSync and the SugarSync iPhone app:

  1. To back up my iPhone photos as soon as I take them. SugarSync lets you take photos from within the iPhone app and they get stored automatically. Or you can use the workaround that I figured out to route your photos through Dropbox and use the CameraSync app to back them up. This was the original reason I downloaded SugarSync. I chose SugarSync vs. Dropbox for the following reason:
  2. To back up specific, important files on my computer. This is why I chose SugarSync vs. Dropbox. With Dropbox, you designate a “Dropbox” folder and then put your important files and folders in that folder to be backed up. I prefer SugarSync’s approach, where you leave your files in their intended places and simply tell SugarSync which folders you want backed up by clicking the menu option “Add folder to SugarSync.”

    Update: A commenter has clarified that Dropbox now allows you to select folders outside of the Dropbox folder to sync.

  3. To access my files from anywhere with the SugarSync iPhone app. Not only does SugarSync back up folders like your typical external harddrive, but it stores them on secure servers AND lets you access them anywhere you go through the iPhone app. If you download a compatible app, such as Documents To Go, you can even edit the files, too.
  4. To access and stream my music from anywhere using the SugarSync iPhone app and online music player. I only recently learned about SugarSync’s music player and I love it for this reason: I can store my music in the cloud and remove it from my iPhone to clear out space, then use SugarSync’s music player to play my music from the cloud.
  5. To share files with anyone, at any time. The other day, I needed to send someone a document, but I had written the document on my laptop originally without the intent to share it. Luckily, SugarSync automatically backed it up as soon as it was saved, and it’s now accessible from my iPhone.

The above reasons are a few of the reasons to use SugarSync, but an email they sent me today suggested a number of other uses for SugarSync:

There are some very powerful ways you can use your new SugarSync account – here are highlights of our top 10:

1.) Back up and secure your data (you never know when your computer will crash)
2.) Access all of your files on the go (from any browser or mobile phone)
3.) Share entire folders and collaborate on projects
4.) Send large files you usually (try to) email or FTP
5.) Share high res photo galleries with friends and families
6.) Stream your entire music collection
7.) Take pictures with your iPhone, auto-sync them to your computer
8.) Open, edit and save office docs with your Blackberry
9.) Work from home, without having to lug around your work computer
10.) Restore all your data if your computer crashes or is stolen

Click to join SugarSync (free)»

Will iCloud Destroy SugarSync?

Apple will soon release a similar cloud service called iCloud, which will give you 5GB free (same as SugarSync) and give you anywhere-access to your files, media, contacts, etc.

iCloud certainly has the potential to crush SugarSync, since it is a similar service and will integrate well with the iOS software. In the end, however, competition is good for consumers overall, so I look forward to seeing what innovations the other cloud services unveil to compete with Apple.

I for one will probably stick with SugarSync unless iCloud offers a far superior value.

Note: This post contains referral links.

How to Automatically Upload iPhone Photos to SugarSync & Dropbox

Auto Upload Mobile Photos Sugarsync

How would you like to snap a photo on your iPhone and have it automatically backed up online, and accessible from your computer or iPad?

With a cloud storage account, you can upload all your recent iPhone photos to a free online storage account, accessible from your desktop, without ever getting near your computer.

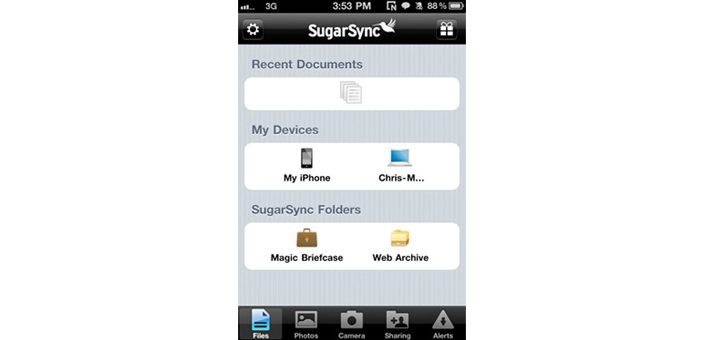
Using SugarSync (the program I use) and/or Dropbox, back up and sync all your important files between your iPhone, your computer, and an online cloud storage account that can be accessed from anywhere.

One of my favorite uses for SugarSync is a tweak that lets me auto upload iPhone photos to SugarSync, so that my Camera Roll is backed up almost immediately after I take a photo.

Whether you use SugarSync or Dropbox, this guide will show you how to automatically upload your Camera Roll photos to your cloud storage account, which can then be accessed from your iPhone, iPad or any computer.

Note this is not a perfect solution, since you need to open an iPhone app to initiate the syncing process, but this tutorial will explain how to make the photo backup process as seamless as possible.

This solution is much better than the SugarSync iPhone app feature which requires you to manually upload your photos or take photos from within the SugarSync app in order for them to be stored.

These instructions explain how to use the CameraSync app to upload photos to Dropbox, and then (optionally) to store these photos in SugarSync. Both solutions require a Dropbox account. Get a free Dropbox account here.

Then, optionally, get a free SugarSync account here. Why SugarSync? I use SugarSync because they offer 5GB of storage instead of Dropbox’s 2GB, and SugarSync is a better cloud storage service and file manager overall, in my opinion.

Dropbox: Automatically Upload Mobile Photos

To automatically* upload mobile photos to Dropbox, you will need:
*Remember, this solution is almost automatic. You need to open an app (and that’s it) to prompt the photo syncing.

  1. A free Dropbox account
  2. CameraSync ($1.99 in the App Store, as of this writing)
  3. Optional: A free SugarSync account, if you would like to use SugarSync.
  4. For those who jailbreak iPhone: Optionally, you may install the Backgrounder app so that you need only to open the CameraSync app one time and it will continue to run in the background.

Syncing Photos to Dropbox

Once you sign up for Dropbox and install it on your computer, create a new folder in your Dropbox » Photos folder. I called this folder iPhone Photos.

From there, I downloaded the CameraSync app from the App Store and linked it to my Dropbox account. Note, you can also sync your photos to other cloud services, such as Flickr, Amazon S3 Bucket, Box.net, or an FTP server.

CameraSync Dropbox

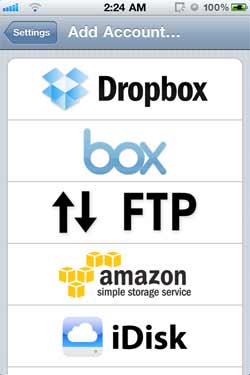
Once you’ve added your Dropbox account, tap the account name (e.g. Dropbox) in the CameraSync Settings page, then tap Edit Account.

CameraSync Edit Account

Sign in and choose a folder to sync to (e.g. the iPhone Photos folder you previously created.)

CameraSync Folder

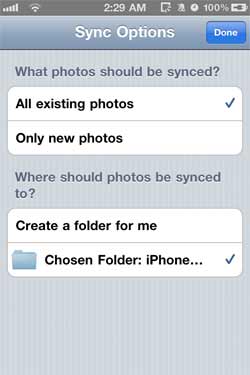
Now, every time you open the CameraSync app, it will begin to sync up your iPhone Camera Roll to your Dropbox account.

Auto Sync Mobile Photos to SugarSync

If you use SugarSync as your main cloud storage solution, then all you have to do is add your Dropbox » Photos » iPhone Photos folder to SugarSync and it will be backed up there after it is backed up in Dropbox.

Jailbreak

If you have a jailbroken iPhone, then you can download Backgrounder from Cydia and add CameraSync as an Override (with Backgrounding method set to Backgrounder) so that it is always running in the background.

Note: This post may contain referral links, which I use only to recommend products or services that I personally use and enjoy.

Updated Comment Policy & Community Guidelines

Commenter on a Soap Box

In response to some recent mean-spirited comments left on this blog, I have decided to write this Comment Policy to clarify basic etiquette that I expect from commenters at AppleiPhoneReview.com.

To be clear, most commenters are courteous and helpful, but these rules are intended for those few bad apples who offer no value to the conversation.

I reserve the right to edit or delete your comment if you disobey any of the following community guidelines. Breaking any of these rules more than once may get your IP address(es) banned from the comments section, at my discretion.

Thank you to the majority of commenters on this site who are kind in their replies.

Mandatory Community Guidelines

1. No insults. You have a right to express disagreement with an article on this site or with a comment, but express yourself in a civil manner. You probably wouldn’t call someone you disagree with “an idiot” (or worse) to their face, so don’t do it on this blog.

2. If you represent a company or institution of any kind, then you must disclose your affiliation in the comments. It is acceptable to talk about your commercial product or service on this site, as long as you are honest about who you work for.

3. Add value to the conversation. If your comment is simply a valueless statement such as “I love iPhone,” then it is not worth posting. Please either make an insightful comment, ask a question, or help someone by answering theirs.

In the coming days, I will be removing and/or editing past comments that do not follow these guidelines. Thanks for your patience as I deal with the occasional mean or dishonest commenter.

Jailbreak iPhone 4.0 for iPhone 4 & iPhone 3GS

How to Jailbreak iPhone 4, iPhone 3GS with iOS Version 4.0 Using JailbreakMe.com.

Warning: Jailbreak at your own risk. Please exercise caution and read the comments, as these jailbreak instructions are not guaranteed to work.

To jailbreak another version of the iPhone, visit the ultimate iPhone Jailbreak guide.

This tutorial contains instructions on jailbreaking your iPhone without the need for a computer. This is the easiest jailbreak there is for iOS 4 users.

Jailbreak iOS 4 on iPhone 4 & iPhone 3GS

Required:

  1. iPhone 4 or iPhone 3GS
  2. Firmware: 4.0 (check your version in Settings » General » About)

Jailbreak Instructions

1. Open Safari on your iPhone and visit JailbreakMe.com.

2. Touch “Free” and then “Install.”

3. Wait patiently and, if all goes well, you will have a jailbroken iPhone.

Was your jailbreak successful? Please post questions and suggestions in the comments.

Jailbreak iPhone 4.0.1 for iPhone 4 & iPhone 3GS (Windows & Mac)

How to Jailbreak iPhone 4, iPhone 3GS with iOS Version 4.0.1 Using Redsn0w.

Warning: Jailbreak at your own risk. Please exercise caution and read the comments, as these jailbreak instructions are not guaranteed to work.

Got another iPhone version? Visit my in-depth iPhone Jailbreak guide for an organized database of the latest iPhone jailbreak instructions.

This tutorial contains jailbreak instructions for both Windows and Mac users, using Redsn0w.

Windows & Mac Users

Required:

  1. iPhone 4 or iPhone 3GS
  2. Firmware: 4.0.1 (check your version in Settings » General » About)
  3. iTunes 9.2.1
  4. Download iOS 4.0.1 IPSW (iPhone 4 (GSM) or iPhone 3GS)
  5. Download Redsn0w 0.9.5b5-5 (Windows or Mac)

Jailbreak Instructions

1. Open Redsn0w, click Browse and select the iOS 4.0.1 file that you previously downloaded.

2. Check Install Cydia and hit Next.

3. With your iPhone off and the USB cable plugged in, click Next.

4. Follow the on-screen instructions to put your iPhone in DFU mode. Your iPhone will restart and be fully jailbroken.

Was your jailbreak successful? Please post questions and suggestions in the comments.